Why Walls Crack in Bali — and How to Fix Them Permanently
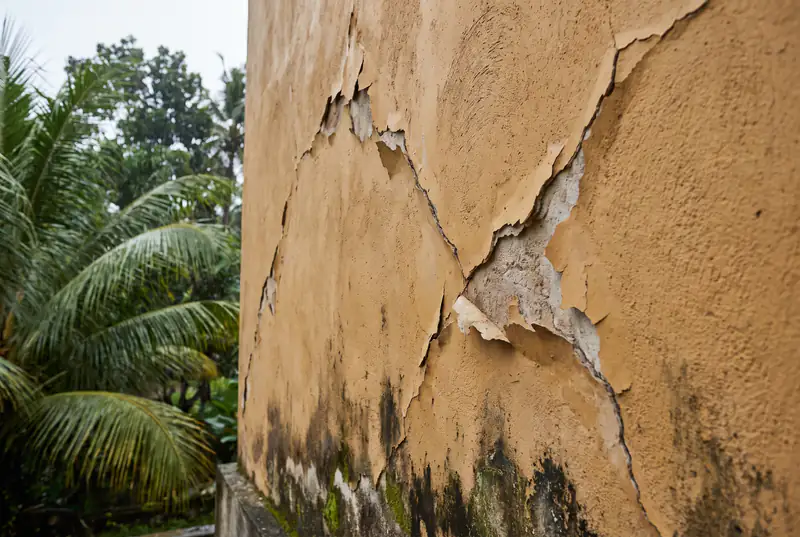
Walk through any villa in Canggu that’s 12–18 months old and you’ll find them: hairline spiderwebs on the render, a diagonal line climbing from a window corner, a filled crack that came back through fresh paint. Owners blame “Bali humidity” — but humidity is only the finisher. In ten years of repairing walls here, we see the same six causes over and over, and almost all of them were built into the wall before you ever saw it.
The six real reasons walls crack in Bali
1. The build was too fast — nobody cured the render. Cement render gains strength slowly and needs to stay damp for the first 3–7 days; full cure takes weeks. On a rushed site the crew renders on Monday, skims on Wednesday and paints on Friday, so the render dries out in the tropical sun instead of curing. Fast drying means heavy shrinkage, and shrinkage means the map-pattern cracking you see everywhere. This one cause explains more cracked walls in Bali than everything else combined.
2. Unwashed sand in the mix. Cheap site-mixed render often uses river or even coastal sand with silt, clay and salt still in it. Silt steals bond strength; salt keeps pulling moisture in forever, which is why you sometimes see white, fluffy efflorescence around a crack. Factory blends like Mortar Utama MU-301 or Drymix cost more per bag precisely because the aggregate is graded and clean — and their shrinkage is dramatically lower.
3. No mesh where brick meets concrete. A typical Bali wall is a concrete frame infilled with brick or AAC block. The two materials expand and shrink at different rates, so every column-to-blockwork junction is a built-in crack line — unless the crew embeds fibreglass or metal mesh across the joint before rendering. Most day-rate crews skip it. The result: dead-straight vertical cracks tracing the hidden column edges, usually within the first year.
4. Vibration from the site next door. In Berawa and Pererenan there’s always something being built 20 metres away. Months of excavators, compactors and piling send vibration through the ground into your walls, and young render takes it badly. We repair a noticeable cluster of “mystery cracks” in villas that sit beside active construction — the mystery is usually next door’s foundation work.
5. Foundation settlement. A lot of Bali villas stand on former rice paddies: soft, wet, compressible ground. If the fill wasn’t compacted properly or the footings are shallow, one corner of the building settles a few millimetres more than the rest. Walls don’t bend — they crack, in stepped or diagonal patterns. This is the one cause on this list that no plasterer can fix, and we’ll tell you so to your face.
6. Wet season / dry season cycling. Here is where climate genuinely matters. Walls absorb moisture through weeks of December rain, then bake dry through August. Every cycle the render expands and contracts slightly; weak spots open a little more each year. Humidity doesn’t create the flaw — it finds every flaw the builder left behind and slowly makes it visible.
Which cracks are dangerous — and which are just ugly
Before you panic (or relax), read the crack. Width, direction and pattern tell you almost everything:
| What you see | Typical width | What it means | Who fixes it |
|---|---|---|---|
| Fine map / spiderweb pattern | < 0.5 mm | Render shrinkage — cosmetic | Plasterer |
| Straight vertical line at a column | 0.5–2 mm | No mesh at the frame joint | Plasterer |
| Diagonal from a door/window corner | > 2 mm, growing | Movement concentrating at the opening | Engineer first |
| Stepped crack following block joints | any | Foundation settlement | Engineer first |
| Horizontal crack with damp or bulging | any | Moisture + debonded render | Plasterer, after the leak |
The simple rule we give every owner: hairline and stable — cosmetic; wider than 2 mm, diagonal from openings, stepped through the blockwork, or visibly growing — get a structural engineer’s opinion before spending anything on finishes. Monitoring is free: draw a pencil line across the crack, date it, and photograph it monthly. If the line shears, the building is still moving.
Why “just fill it and repaint” fails within three months
The default handyman repair — scrape, smear on some putty, roll paint over it — has a near-perfect failure rate, and it’s worth understanding why. A surface smear has no depth: the filler sits on the crack like a plaster on unbroken skin, bonded only to the paint layer around it. Meanwhile the original cause — shrinkage stress, joint movement, seasonal cycling — is still active. The wall moves a fraction of a millimetre, the rigid putty can’t stretch, and the crack telegraphs straight back through, usually right when the wet season starts. We’re often called to walls that have been “fixed” three or four times this way; each round adds a lumpy scar of old filler that eventually has to be cut out anyway. A repair that doesn’t address depth, bond and movement isn’t a repair — it’s scheduled repainting.
How we repair cracks so they stay repaired
Our standard sequence for non-structural cracks — the method behind our crack repair service — takes five steps and survives the seasonal cycle because every step targets one failure mode:
- V-cut to ~5 mm. We open the crack with a grinder into a V-groove about 5 mm wide and deep. This gives the filler real volume and a mechanical key instead of a surface smear.
- Dust removal and priming. The groove is brushed, vacuumed and primed. Filler bonded to dust is bonded to nothing — this boring step is where most quick fixes die.
- Elastic filler. We fill with a flexible acrylic compound that can absorb the micro-movement Bali walls never stop making, rather than a rigid cement putty that re-cracks.
- Fibreglass mesh bridge. A 100 mm strip of alkali-resistant mesh is bedded over the line, spreading any future stress across the whole band instead of one point.
- Local skim, then repaint the whole wall. The band is skim coated flush and sanded under a raking light. Then we repaint the entire wall, corner to corner — patch-painting always shows as a sheen halo, even with the same Dulux or Jotun tin the painter used last year.
Done this way, a repaired crack in a structurally quiet wall stays closed. Budget around IDR 120,000–150,000 per linear metre plus repainting; full numbers for every finishing trade are in our 2026 plastering cost guide.
Damp and mould: the crack’s travel companions
Cracks and moisture feed each other. A 1 mm crack on a facade drinks wind-driven rain all wet season; the wall behind it stays damp, the paint film blisters, and black mould blooms in the corner. In Ubud, where villas sit shaded under canopy and humidity rarely drops below 80%, we see mould tracking along crack lines like a highlighter. In Umalas and Kerobokan the pattern is different — ground moisture wicking up through unsealed footings meets shrinkage cracks a metre off the floor. In every case the order of work matters: kill the moisture path first (gutters, sealing, drainage, ventilation), then repair the crack, then repaint with an anti-fungal system — Nippon or Jotun both make good tropical-grade paints for exactly this. Painting over a damp crack is the most expensive way to change nothing.
Prevention: what to demand when new walls are plastered
If you’re building or re-plastering now, cracks are mostly a purchasing decision. When you brief a wall plastering crew — ours or anyone else’s — put these five lines in the contract: factory-blended render (Mortar Utama or Drymix) or washed, sieved sand only; mesh embedded at every concrete-to-block junction and over every chased pipe; render applied in two passes to 15–20 mm total, never one thick coat; misted curing for at least 3 days before the acian skim; and a written schedule that leaves render at least a week before paint. Those five lines add maybe 10–15% to the plastering line item and remove about 90% of the cracks you’d otherwise be photographing next year. Cheap render is the most expensive thing you can put on a wall in this climate.